
Beginner’s Guide to WooCommerce Inventory Management in 2021
Running an online store can be challenging. Between production and marketing, it’s easy to overlook the importance of WooCommerce inventory management. However, this seemingly simple skill can be critical to managing a successful store. Therefore, understanding the basics is essential.
Fortunately, the process doesn’t have to be complicated. By learning the ropes of WooCommerce inventory management, you can ensure that your store is always ready for customers.
In this article, we’ll cover why inventory management is so important to a well-run store. Then, we’ll cover four key areas to controlling your store’s inventory:
- Why WooCommerce inventory management is essential
- An introduction to WooCommerce inventory management
- How to control stock status for individual products and variants
- How to bulk control WooCommerce inventory management
- How to view stock status reports
Let’s get started…
Why WooCommerce inventory management is essential
Keeping an eye on your stockroom is a simple yet essential part of any successful online store. Staying organized ensures that you’ll always be prepared to sell to an interested customer, or at least have a wish list option ready in case you run out. This can maximize your potential profits.
Moreover, top-notch inventory skills can act as a sales strategy. Understanding which items sell the fastest lets you redirect production towards your most lucrative niche. It can also prevent you from investing in products that may not be performing as well.
Furthermore, having an up-to-date awareness of your stock can help ensure that your records are accurate. This can prevent annoying miscommunications or incorrect expense spending down the line.
All you have to do is calibrate some settings to maximize their performance in your store. Given that inventory management is so crucial, you might find that getting acquainted with these features early on helps you in the long run.
An introduction to WooCommerce inventory management
First, we’ll cover a few basics before diving into the details.
Let’s start with WooCommerce’s global inventory management features. Navigate to WooCommerce → Settings → Products → Inventory:
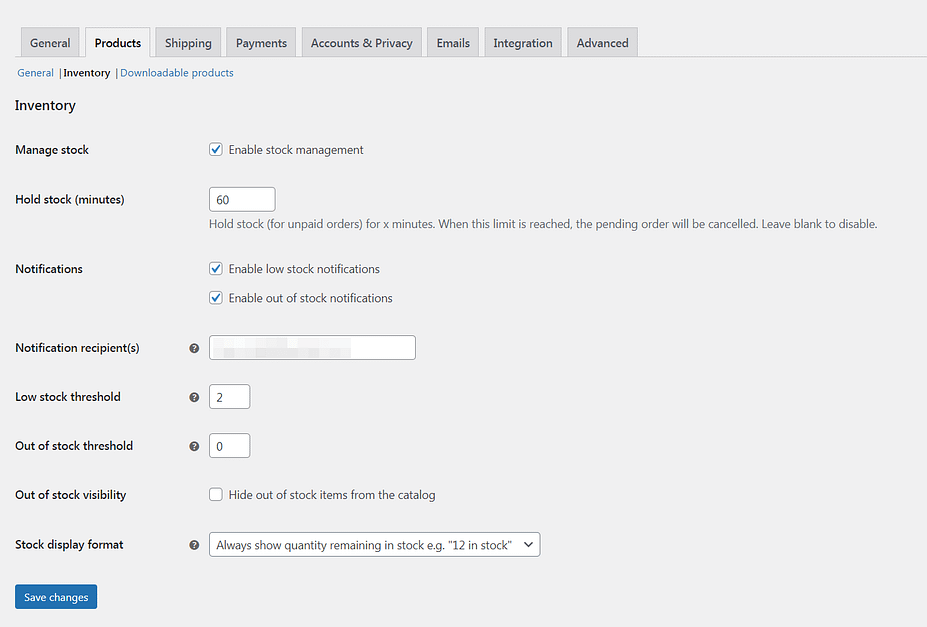
You’ll want to make sure that Enable stock management is checked before we begin. Next, you can also enter how many minutes you’d like to Hold stock for. This applies to orders that have been made, but not paid yet. If this limit is reached and a user hasn’t paid yet, the pending order will be automatically canceled.
Next, you can also enable low or out of stock notifications. These can keep you up-to-date on your inventory. Just make sure to add a notification recipient and the threshold for the low-stock message.
You may also want to check the box under Out of stock visibility. This prevents shoppers from seeing items they can’t buy. Finally, you can determine how the inventory will display on the front end under the Stock display format drop-down menu. Click Save changes when you’re ready.
How to control stock status for individual products and variants
Now that you’ve set up the basics, let’s go through how you can assign stock status to simple or variable products.
Managing stock status for simple products
A simple product is any item that has no options for customers to choose from. For example, a single version of a book or collectible would be a simple product. Most of the items you sell probably fall under this category.
We’ll go over two essential elements: calibrating your inventory and leveraging the advanced features. To get started with both, open up the simple product you want to adjust and go to the Inventory tab in the Product data box:
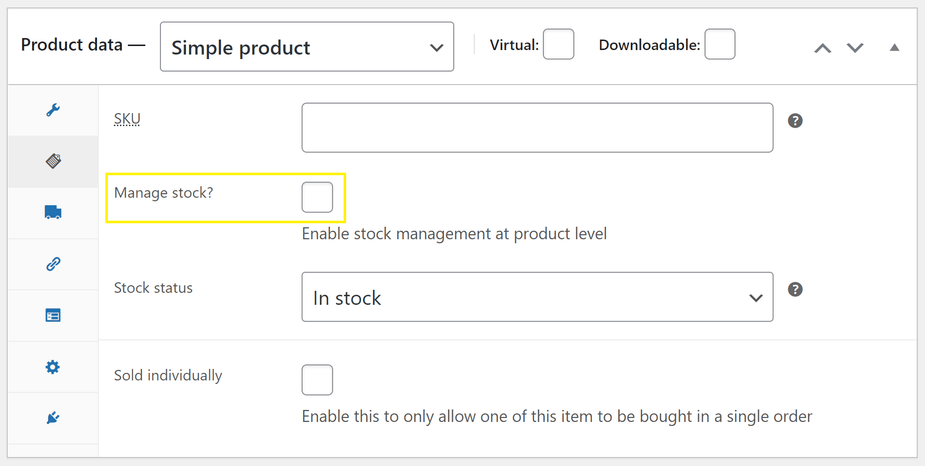
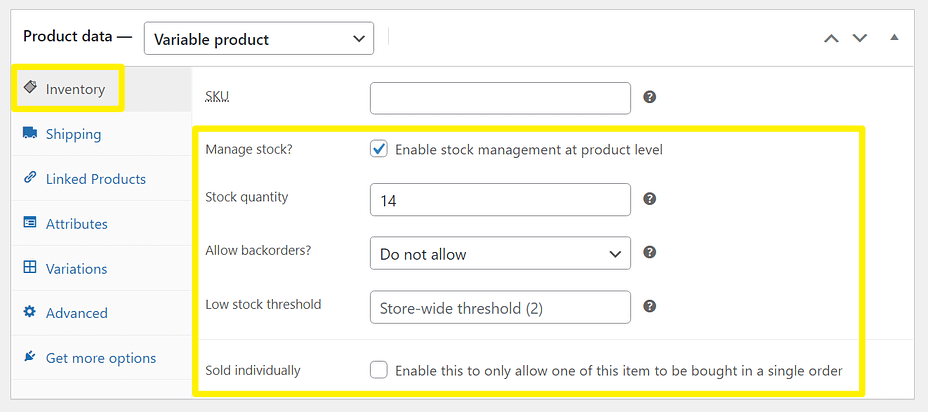
You’ll see a box labeled Manage stock?, as highlighted above. Make sure to check that option before you get started. This is required to enable the options you’ll need. Once you’ve done that, you can move on to the basics of WooCommerce inventory management for simple products.
Calibrate your inventory
Your screen should now look something like this:
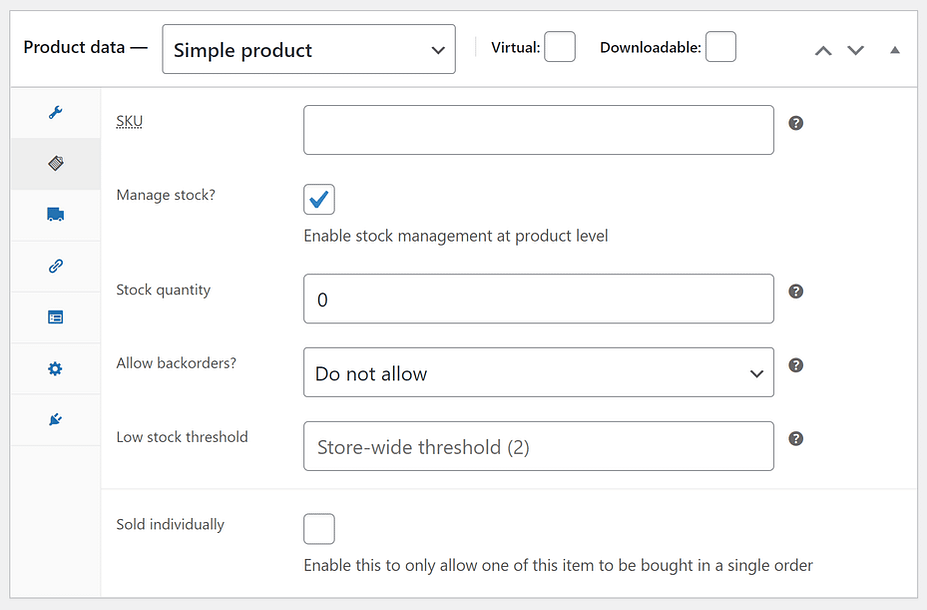
We’ll begin with the first option on the list: the Stock Keeping Unit (SKU). The SKU is a unique key for each product. If you like to have exact control over your inventory, you might want to use one. However, it’s not necessary, so feel free to skip it.
Next up, you can fill in the Stock quantity field with however many items you currently have available. The good news is that you’ll only have to do this when your stock goes up. We’ll also share some tools to help you manage stock later on.
Whenever someone purchases this product, WooCommerce will automatically subtract the quantity in their order from the stock status. For example, if you set the stock status to 15 and then a shopper purchases 2 of the item, the stock status will automatically drop to 13.
This helps keep your site effortlessly up-to-date. Nevertheless, we still recommend checking in on your stock regularly. It’s an easy way to stay informed about your own store.
These are the basics of managing simple products: adding an identifier and understanding how the stock system works. However, you also have access to a few other features that can further simplify your store’s organization.
Advanced WooCommerce inventory management features
Further down on the screen, you should see an option for Low stock threshold. Whatever number you enter here will act as a trigger. When your stock reaches that number, you will automatically receive an alert.
An early alert can be a smart way to ensure that you’ll never miss out on a sale. This can be an effective solution for staying in the loop without too much manual work. If you don’t fill in this field, you’ll get notifications on the default WooCommerce store-wide schedule.
If you don’t want too many notifications, you can try extending your default settings so that they are less common, and then set up triggers for fast-selling items. This can cut down on alerts while also making sure your profitable stock stays filled.
Moving along, you’ll also see an option for allowing backorders. This will enable customers to place orders even when the objects are out of stock. You can also choose to activate this feature while alerting customers to the situation to keep them informed.
Finally, you have the option of selecting Sold individually. This means users will only be able to purchase one of those items per order. If you’re looking to create buzz around a product, this can be a useful way of making it seem more exclusive.
After you’ve completed all the fields, it should look something like this:
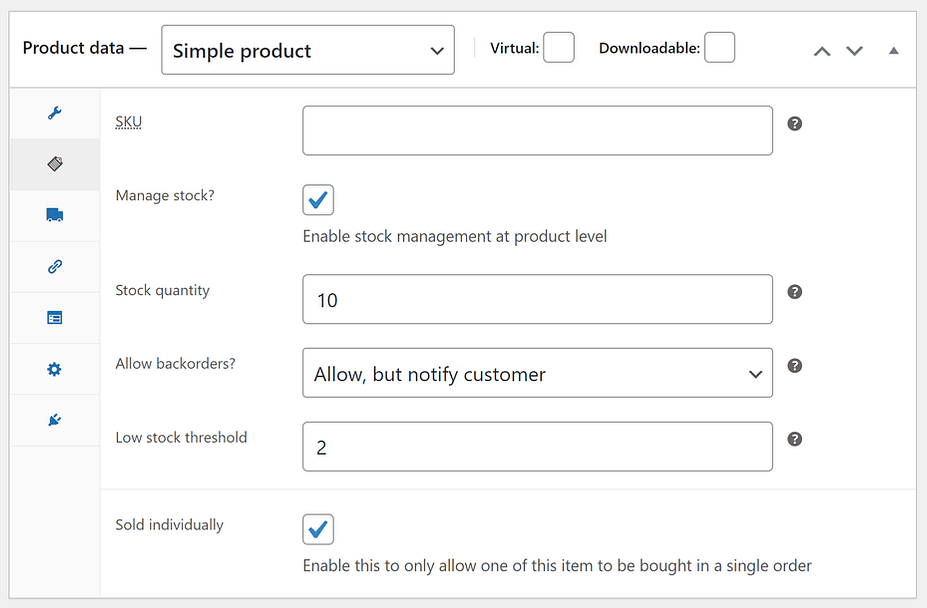
These fields are fairly variable, so don’t worry if yours looks different than our example. Just make sure that all the required fields are filled out to your liking.
Managing stock status for variable products
While there’s not much to a simple product, variable products give you some more flexibility. Each iteration of a variable product can have different traits, stock, and prices.
For variable products, you have the option to manage stock at two different levels:
- Product level.
- Variation level.
To illustrate the difference, let’s say you sell a t-shirt in three sizes – small, medium, and large.
Let’s say you have five shirts in each size – 15 total:
- Managing at the product level – you would set the stock to 15. If someone purchased a small shirt, the collective stock for the t-shirt product would drop to 14, but you wouldn’t be able to tell that you only had four small shirts left.
- Managing at the variation level – you would set the stock for each variation to 5. If someone purchased a small shirt, the stock status for the small variation would drop from 5 to 4, which lets you know exactly how many of each variation you have left.
For most variable products, you’ll probably want to manage stock at the variation level.
The one exception where you might want to manage variable products at the product level is if you sell variable products that share a common base item. For example, maybe you sell a water bottle that you add a sticker to based on the shopper’s variation choice. Since the base water bottle is exactly the same for all the variations, it might make more sense to manage stock at the product level.
To manage stock status at the product level, you can go to the Inventory tab of the Product data box just like you did for simple products. Check the box to Enable stock management at product level and you’ll be able to enter the same details as above:
To manage stock at the variation level, go to the Variations tab in the Product data box. Select one of the variations. Then, check the box to Manage stock. That will expand some new options where you can manage the stock status for just that specific variation:
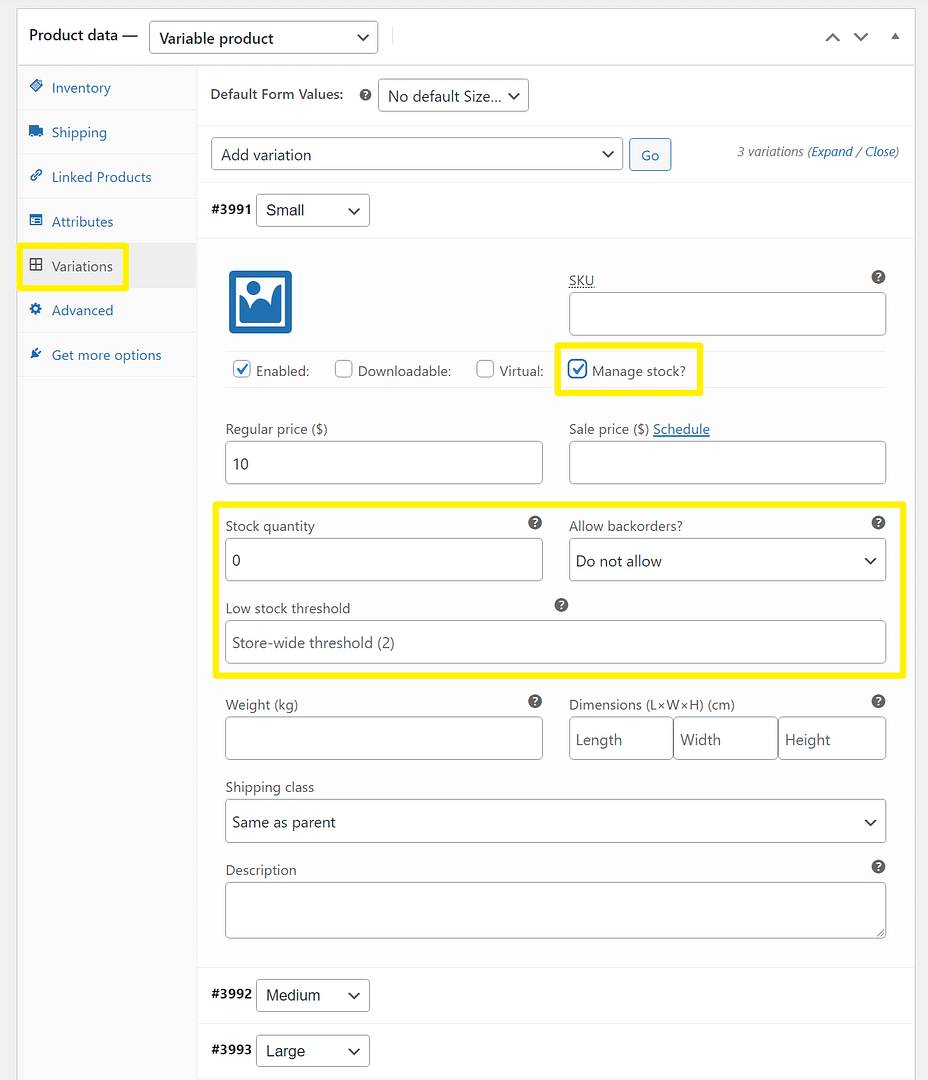
You can then repeat the same steps for other variations to control their stock statuses.
How to bulk control WooCommerce inventory management
At this point, you might’ve realized that managing the stock status for individual products from the editor can get tedious and time-consuming if you have a lot of products.
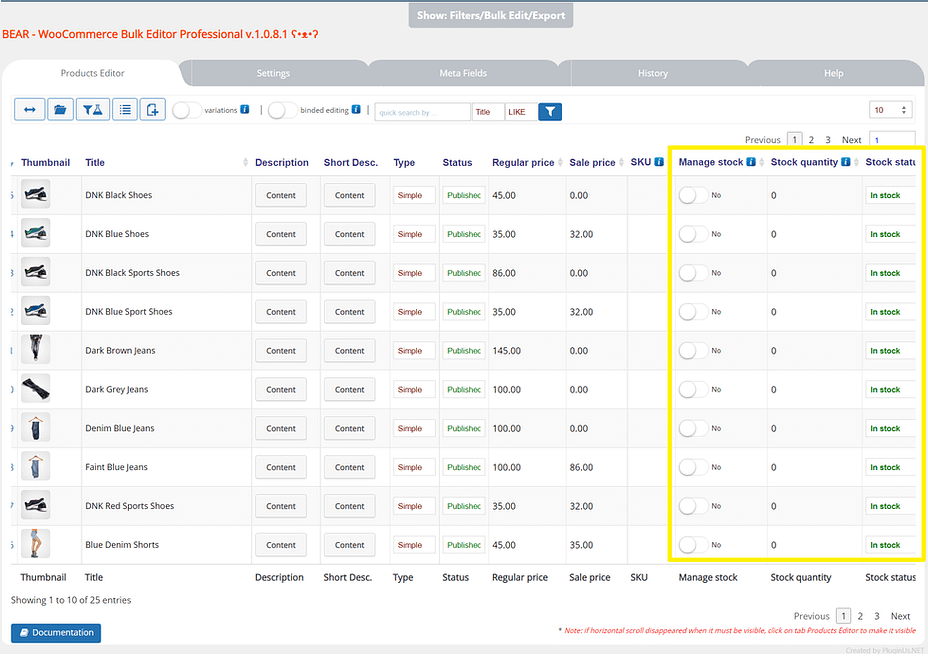
To simplify WooCommerce inventory management, you might want the help of a plugin such as a bulk table editor.
With a bulk table editor plugin, you’ll be able to manage the stock status for all of your products and variations from a single table interface. Here’s an example of what it might look like:
Or, you can also find dedicated WooCommerce inventory management plugins that are specifically focused on just stock status.
Here are some of the best WooCommerce inventory management plugins to consider:
- BEAR (Bulk Editor & Products Manager) – pictured above.
- PW WooCommerce Bulk Edit
- WooCommerce Stock Manager
- Bulk Table Editor
How to view stock status reports
Above, we showed you how to set up stock notifications for products. Another way to keep an eye on your store’s inventory, though, is to use WooCommerce’s built-in stock reports.
You can access these by going to WooCommerce → Reports → Stock:
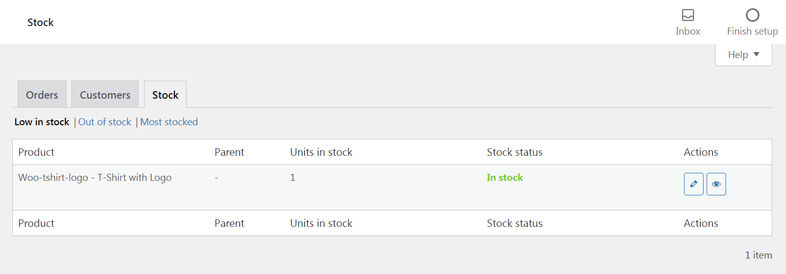
Here, you can see three categories of reports: those for low stock, out of stock, and most stocked products. This is a quick way to easily visualize your store’s performance and see which products require your attention.
Post a Comment