Want to learn how to translate WooCommerce store?
If you are drawing customers from various parts of the world, translating your WooCommerce store 
Viewing product information 

In addition to that, we will show you how to translate the text only on the front end of the store and the admin dashboard without using any plugin.
Let’s dive into the tutorial!
How to change WooCommerce language
There are three ways to change the WooCommerce language. Those are:
- Use the built-in site language option to change the store language (for a single-language store).
- Use the built-in profile language option to change the dashboard language (to simplify your admin management).
- Use a translation plugin to change store language to multiple languages.
Basically, in the first section, we’ll show you how to change WooCommerce language for a single-language store.
Then, in the next section, you’ll learn how to translate WooCommerce to create a multilingual store. Click here to skip straight to that section.
1. Change store language only
Using this method, you change the text on the “Add to Cart” buttons, the cart page, checkout page, my account page, and other default WooCommerce pages.
But this method won’t help you change the language of the text that you manually insert on your store like product titles and descriptions. You would need to do that manually via the product editor.
In a nutshell, this method works if you want to change the language of a single-language store.
Change WordPress site language
To change your WooCommerce store language only, open your admin dashboard and go to Settings → General. Then, look for the Site Language dropdown.
From the dropdown menu select the language of your choice and hit the Save button:

Update WordPress/WooCommerce translations
Next, go to Dashboard → Updates, scroll down to the Translations section and click on the Update Translation button.
This will prompt WordPress to download the WooCommerce language pack for the language that you selected in the previous step:
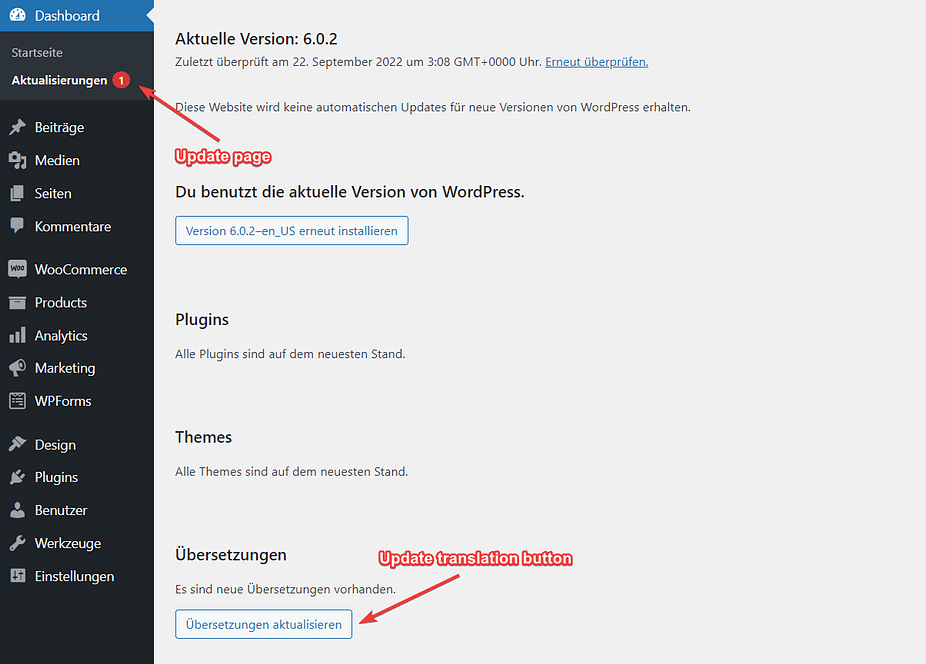
That’s it. The default content of your WooCommerce store should now be translated into the language you choose.
2. Change dashboard language only
Using this method, you will change the language of your admin dashboard while the language on the front end of the site will remain the same.
This method is useful in scenarios where you or other store admins prefer to manage your store in a language that’s different from the frontend language.
However, this method still assumes that your frontend store will only be available in a single language.
Change store language to download language pack (per previous instructions)
To begin, follow the instructions in the previous section to change your store’s language and download the translation packs.
To quickly recap, that means you should…
- Go to Settings → General and use the Site Language dropdown to choose the language that you want to offer your dashboard in.
- Go to Dashboard → Updates, scroll down to the Translations section and click on the Update Translation button.
Again, you can follow the same instructions as the previous section.
Change store language back (if needed)
If needed, you can now go back to Settings → General and use the Site Language dropdown to change your store’s frontend language back to the original language.
Adjust WooCommerce dashboard language for users
Once you’ve verified that your frontend store language is correct, you can now manually override the backend language for individual users by choosing from the new language packs that you downloaded:
- Open your user profile by going to Users → Profile.
- Use the Language option to select your preferred WooCommerce dashboard language.
- Save your changes.

You can use this method to change the dashboard language of other users. Just go to Users → All Users, open the profile of the user, select the language and hit the Save button.
How to translate WooCommerce to create a multilingual store
If you want to create a multilingual store, a translation plugin will help you translate your entire WooCommerce website into one or more languages.
While there are several translation plugins to choose from, we’re going to use the free TranslatePress plugin for this tutorial.
The free plugin allows you to translate your store into one language, including all of the frontend content (single products, shop, cart, checkout, and more).
If you want to translate your store to multiple languages and/or improve multilingual SEO, you will need to subscribe to the premium version which starts at 89 EUR per year.
- Install and set up TranslatePress
- Translate WooCommerce product pages
- Translate cart page & checkout page
- Translate website posts, pages, & menus
1. Install and set up TranslatePress
The first step is to install and activate TranslatePress on your WordPress website.
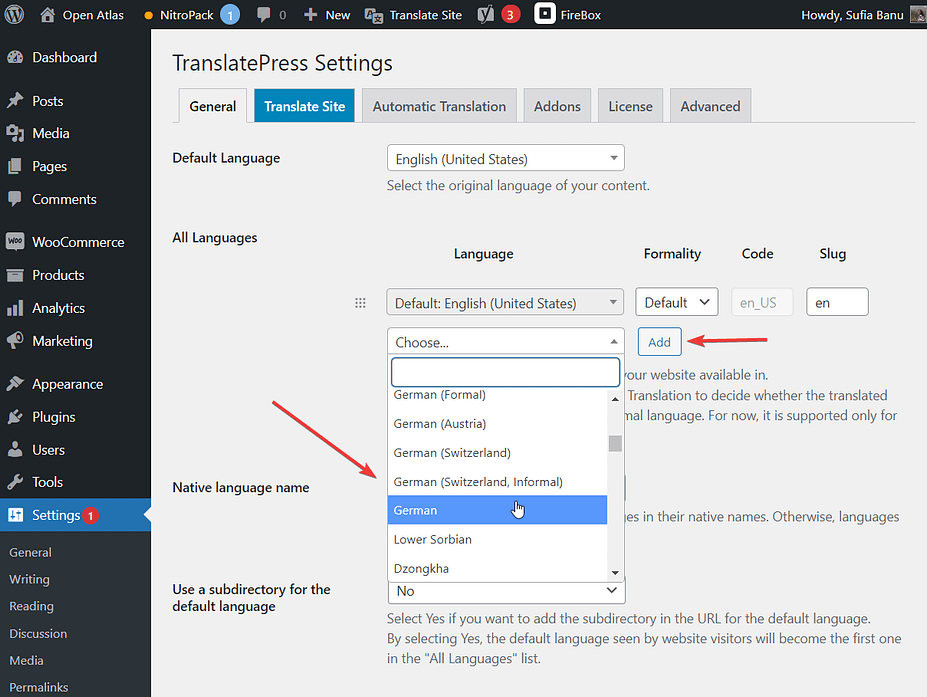
Then go to Settings → TranslatePress → General → All Languages and choose a language from the dropdown menu. Add it and save your settings:
2. Translate WooCommerce product pages
There are four main elements in a WooCommerce product page that can be translated. Those are:
- Product descriptions
- Dynamic content
- Products images
- Page title, slug, and dropdown items
Let’s go through them:
Translate product descriptions, titles, etc.
Open one of your WooCommerce product pages and click on the Translate Page option on your admin bar.
A translation editor will pop out on the left side of your screen. You will be using this editor to translate text on your product page.
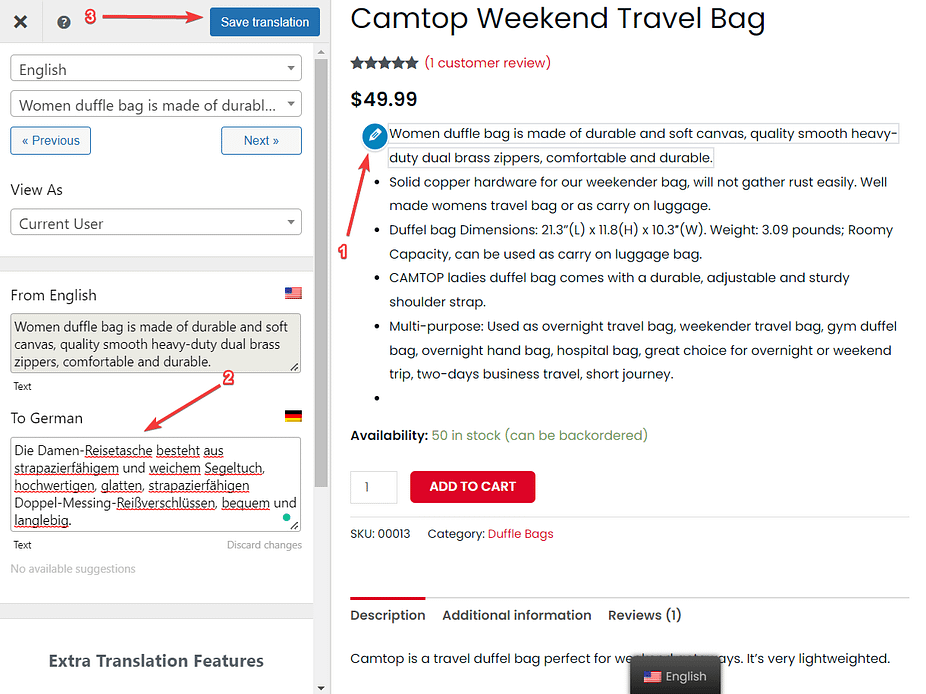
Hover your cursor over the product description you want to translate. A blue pen icon will appear. When you click on it, the text gets selected, and the translation editor provides you with a box where you can write the translated version of the text.
You can translate only one paragraph at a time.
After you make each translation, hit the Save Translation button or use the Ctrl + S keyboard shortcut:
Translate dynamic content
Dynamic content refers to the content that appears on the site triggered by a user action.
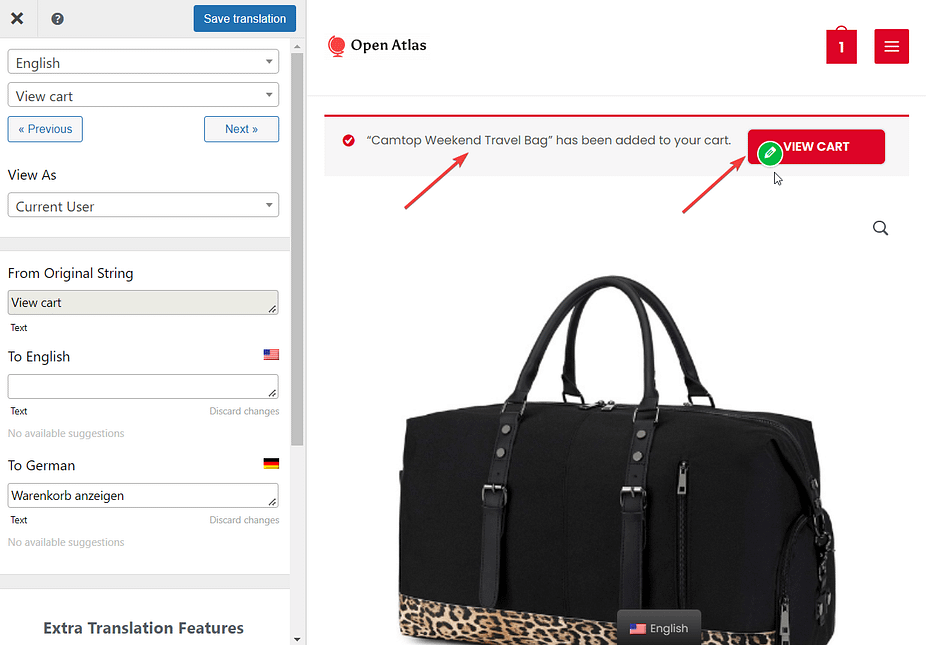
On a WooCommerce product page, dynamic content appears when visitors click on the Add to Cart button. You can translate both the text and the View Cart button by clicking on the green pen icon.
Side note: Wondering why the editor is showing the green pen icon instead of the blue pen icon? The green pen appears over texts that are related to the current theme or some plugin installed on your site. They work just like the blue pen icons. Just click on the icon and use the translation editor to translate the text:
Translate product images
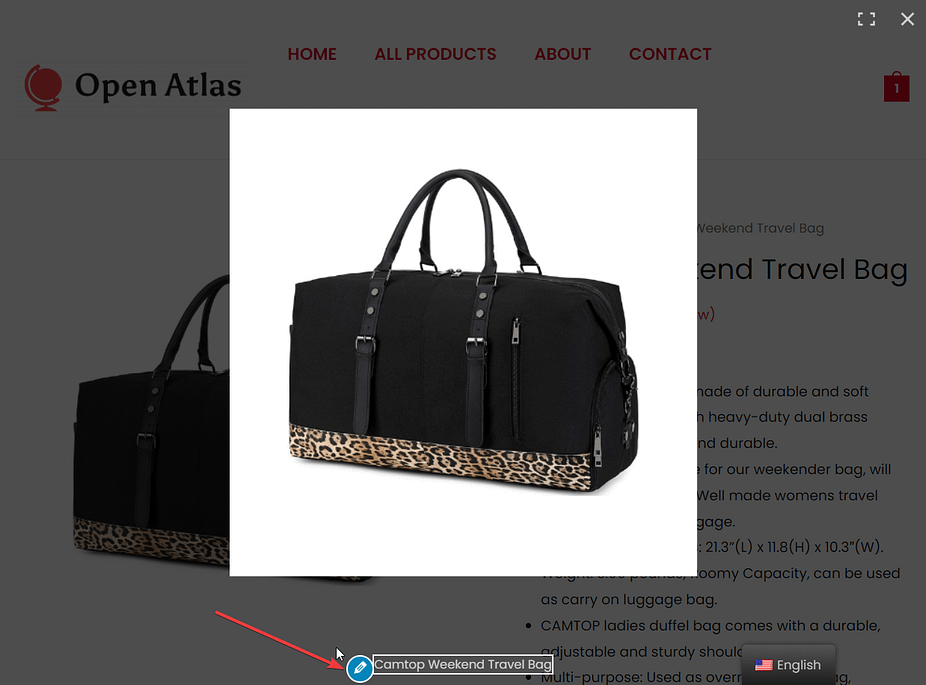
Product images with captions can also be translated into different languages using the same method.
Click the image and the caption will appear with a blue pen icon. Select the icon and start translating the caption in the translation editor:
Translate page title, slug, and dropdown items (Requires paid plugin version)
To translate the page title and slug, you need the SEO pack addon by TranslatePress. It will cost you around 89 EUR per year for a single site.
After you have made the purchase and activated the SEO pack plugin, open the product page. The translation editor will show you extra options called the Meta Information & String Lists.
In the meta information section, you can change the slug and title of the page. And using the string lists option you can change the dropdown menu items found on variable products:

3. Translate cart page & checkout page
When it comes to the cart page, it can be found in either a filled or empty state.
To translate the page into an empty state, go to open your website URL and add “cart” at the end like this: https://yoursite.com/cart/.
Go ahead and translate the text using the pen icon.
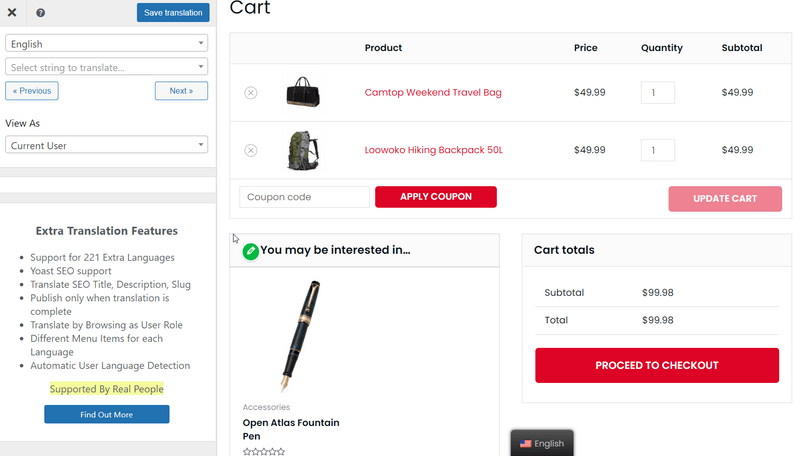
To translate the cart page in a filled state, add at least one product to the cart, open the cart page and start translating the page:
Now, the checkout page has only one version. To translate the checkout page, add “checkout” to the end of your site’s URL like this: https://yoursite.com/checkout/ and start translating the checkout fields.
4. Translate website posts, pages, & menus
If you are aiming to translate your entire website, then make sure you translate all the posts, pages, and menus. Menus should include header, footer menus and pages should include homepage, login, registration, and my account pages.
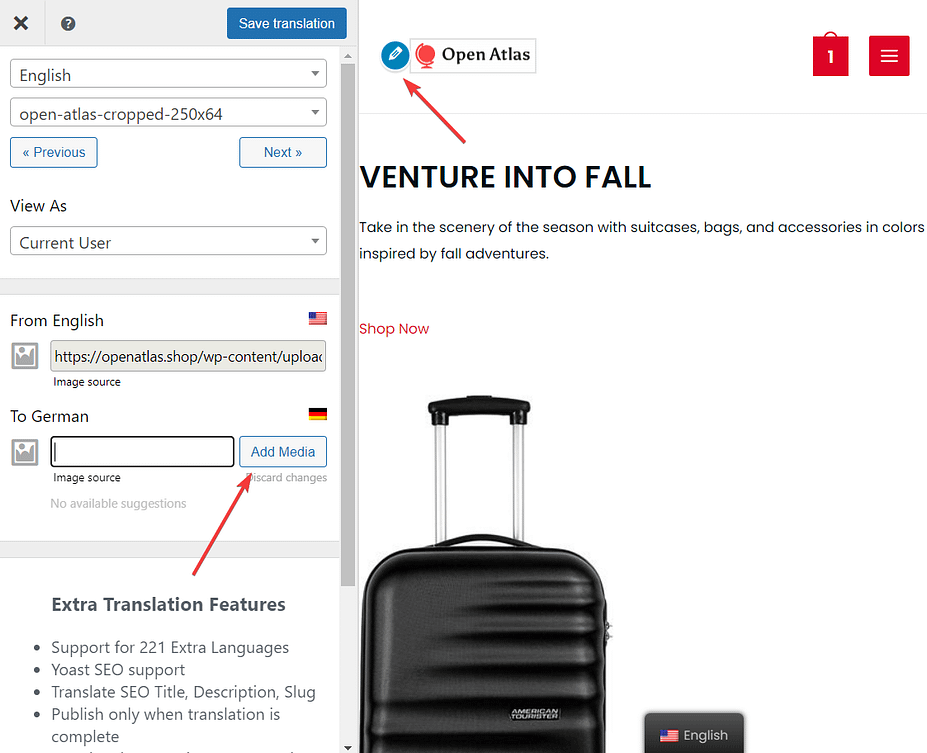
On the homepage, make sure you utilize the editor to change the logo image. You will first need to create a new logo with translated text, then click on the blue pen icon and use the editor to upload a new logo to your website:
That’s all, folks! With that, we have come to the end of this tutorial.
Translate your WooCommerce store today 
Translating your website into different languages can help grow 
You can choose between translating only the default WooCommerce pages and buttons, translating only the WordPress dashboard, or translating the entire WooCommerce website using a translation 
When translating your store using a plugin ensure that you are translating the product pages that include product descriptions, dynamic content, product images, page title, slug, and other SEO elements like sitemaps, and hreflang tags.
You will also need to translate blog posts, header, and footer menus and pages like the homepage, cart and checkout, login, registration, and my account pages.

If you have any questions about how to translate WooCommerce store, let us know in the comments below!
.png)

Post a Comment